Sunday, July 7, 2013

Easy Home Made Goat Cheese


I have always loved cheese.  When I was young, there were about four type of cheese for me:  Cheddar, American, Swiss and the stuff my parents ate.

At this point in my life there is a much wider array of options available to my palate and the choice is more often ruled by my mood than anything else.

Just so we don't start out with a misunderstanding, I don't have happy cheese and sad cheese, it's more of an equation of which cheese am I in the mood to eat.

O.K. So, cheese.  Since I started really thinking about it cheese has had some mysteries for me.  How much milk do you need to make cheese and how much cheese will the milk produce.

In culinary school we "made" mozzarella.  Not really.  We learned how to roll the curd into little balls not how to actually make the curd.  Unless I was horsing around at the beginning of class.  It's possible.  Does anybody out there that went to CCA with me remember?

I don't.

Hence the mystery.

Goat cheese was a bit of a learning curve for me.  The first goat cheeses that I tried did not really float my boat.  They were a little drier than I would want from a fresh cheese and had reasonably boring flavor.

In 2002 I went to France for the first time and my eyes were opened to the many possibilities that goat cheese could present, soft fresh cheese, bloomy rind aged cheese, drier aged cheeses.  the possibilities seemed endless as did the flavors!  And all this from one type of milk.  WOW!

I made my first batch of fresh goat cheese a few weeks ago and it turned out really well.  It was cool to see it come together as the fog of mystery started to lift.

Still my question of how much cheese you get from the milk is still in the formula stage since I buy milk by the gallon and cheese by the pound.  I forgot to weigh the milk before I started so for now we will have go with this understanding:  one half gallon of goat milk (about 2 liters) yields about 7-12 oz of cheese (198 g) depending on how dry (firm) you want the final product to be.

The best part is that the basic cheese is easy and fun to make.

Here is the recipe:

1/2 C Water
1 tsp Citric Acid
2 Qt Goat Milk
1 tsp Kosher Salt (more or less to taste)
Herbs (if you want them)

Equipment:

Small Bowl
3 qt Sauce Pan
Stainless Slotted Spoon
Meat Thermometer
Colander
Fine Cheesecloth

Pretty simple.  

For the thermometer you can use a regular analog type or an electronic one.  


The two types of thermometers have upsides and downsides.  The analog type should be frequently calibrated daily (downside) and are inexpensive (upside).  The electronic type read the temperature more quickly and are far more accurate (upsides) but they will cost more (downside). 

I for one, use an electronic thermometer for the sake of saving time and accuracy of my temps.  I use a Comark PDT300 thermometer.  It reads the temperature very quickly and accurately and the battery life is great.  You can get one at a restaurant supply store or online for about twenty dollars, I think it is worth the investment.

Let's make cheese!

Add the citric acid to the water and set aside for it to dissolve.


Pour the goat milk into the sauce pan and turn on the head to medium.  


You are going to heat the milk to 190-195F while stirring occasionally with the slotted spoon.  On my stove it took about twenty minutes for the milk to reach the final temperature.


When the milk is ready it will be a little frothy and steam a bit.  See the edges of the pan above.

Add the citric acid mixture and gently stir for about 30 seconds.


Remove from the heat and let the pot stand for ten minutes or so.

the curds should be visible at this point.  If you draw the spoon back slowly over the surface of the liquid, you should see the white curds and a translucent yellow liquid.


Line the colander with cheesecloth and gently pour the contents of the sauce pan into the colander.  


I set the colander into the top of a large pan to catch the whey.  


I don't know why I do this as I have, so far, always thrown out the whey as I don't know what to do with it.

The curds will begin to collect in the colander as the whey slowly drains out.  


After about 30 minutes the curd will look like really wet mashed potatoes.  


Add your kosher salt to taste.  remember that the salt will taste much stronger while the cheese is hot, so a little salty is good as long as you will be eating the cheese cold.


Once the cheese has started to firm up a bit, I place it in the refrigerator over night to dry out a little more.


The next morning, I get the cheese out of the refrigerator and inspect it.  I check the texture.  today I am looking for a creamy spreadable end product, so I am done.  If you are looking for something more firm, just let it go a little longer.  Below is the goat cheese unwrapped and ready for storage or a nice piece of bread!


Lastly I pack it into a small airtight container - or just sit down with a little bread and eat!  My wife had purchased a fresh cheese from a local specialty store so we had a chance to have some side-by-side comparison.  


I don't know which was better, they were just different.  Mine more creamy with a subtle flavor, the other more firm with a stronger flavor.  I have to say that I like mine more, but then again, I'd judt made it.  Pride has to count for something!

Saturday, June 29, 2013

Easy, Authentic Barbecue


Right after culinary school I had a job at the Fairmont Hotel in San Francisco.  There were five restaurants on the property and I worked at "Masons", the best of all of them.  When I started I was working the grill and was trained by this really cool black guy from South Carolina or some place like that.

One day he asked me what I was going to do on my weekend and I answered "Probably just hang out at home and barbecue."

He said excitedly "You barbecue?"

That was when I learned that there was a difference between "barbecue" and "grilling".  

The internet was still a pretty new thing and I had never been on it before.  It wasn't, as far as I knew a research tool that I could use to find anything about cooking, so I went to the bookstore and started looking at some barbecue cook books.  To tell the truth, I didn't even think of the internet to answer my questions about the ins and outs of barbecue.

I also started really paying attention to the properties of the food when I went out to get some.

There was a great place down on Divisidero called "Brother-In-Law's #2".  I don't know where or if there was a number one, but #2 was a wonderful hole in the wall that you would just as soon drive past and not give it another thought.  It was small, had weird hours and had some funny and rather nice folks working there.

Almost all of their business was to go since there was only one table with four chairs.

Their ribs, chicken and links were all very juicy and delicious.  Not like my ribs at home.  mine were good, mind you, but they were doing something that I was not.  I had to find out how to do that at home!
Today I am going to tell you how to make barbecue in two simple ways using the same basic ingredients that will make you the talk of all your friends after your next back yard barbecue.

We're going to make BBQ Chicken and BBQ Brisket.

The first thing you need to make is the dry rub, this is important.

Dry Rub:

3/4 C New Mexico Chile Powder
1/4 C Kosher Salt
1/4 C Granulated Sugar
2 T Yellow Mustard Powder
1/4 C Ground Cumin
2 T Ground Black Pepper
1/4 C Granulated Garlic


Place everything into a bowl and mix it thoroughly.

Next, make your sauce:

2 C Ketchup
1/4 C Apple Cider Vinegar
1/4 C Worcestershire Sauce
1/4 C Brown Sugar
2 T Molasses
2 T Yellow Mustard Powder
1 T Dry Rub
1/2 tsp Ground Black Pepper
1 T Hot Sauce (I used Chalula Chipotle Sauce)
2 oz Butter


Place all ingredients in a pot and simmer until the sauce thickens a bit, your call on how thick you want it.  


First we'll make the chicken.


Cut the chicken into eight pieces: leg, thigh, and the breasts cut in half.  I didn't use the wing, but you could if you like.


Coat the chicken with the dry rub and let it sit in the refrigerator for at least 2 hours or up to 1 day.  I let mine go for about 5 hours.


Light a large amount of coals in your grill and place them all on one side.

place the chicken on the grill on the side without coals and put the lid down keeping the vents open.


After about fifteen minutes, turn them over and let it go for another 15 minutes or so.

Now the coals will have cooled a bit, they're still hot, but not blazing.  Place the chicken skin-down over the coals and paint them liberally with your sauce.  Let it roll for about ten minutes, turn the pieces over and repeat.


As the pieces in the center become finished, move them toward the out side of the grill or even away from the coals as the rest of the chicken cooks.  I turned the chicken so that it spent two times on each side all the while adding sauce.


Remove from the grill and place on a platter for service.


I found that even the pieces that had some black on them were not bitter as they would have been if I had simply grilled them.  Amazing.  I'll never cook BBQ chicken the old way again!

Now on to the brisket.


I bought a 13 lb brisket from a local meat purveyor and removed some of the fat.  


A good brisket should have a generous helping of fat and marbling, but they usually show up with more than I want.  Set your oven to 220F (104C).


Next I placed it in a roasting pan, coated the entire piece of meat with the dry rub and covered the pan with aluminum foil 


and cooked it from here


to here.  


That's not 4 hours, that's 16!  Start it the day/night before, you'll be glad you did.

There will be a great deal of drippings in the pan.  Mine had 4 C of "juice" and a bout two Cups of rendered fat.  Remove the fat and reduce the juice by 1/2.


Add to the reduced "juice":

2 C Ketchup
1 C Honey
1 tsp Chipotle Powder


Simmer it just like the sauce for the chicken. 

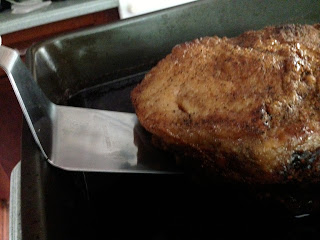
After the brisket is cooked, lift it carefully with a large offset spatula and a wire rack.  


The meat will literally fall apart if you are not careful.  


You can also let it cool to make it easier to handle.

you can serve it as is, or in my case I cut it in half and placed it in my smoker for two hours.


Slice and serve.


Don't you just love cooking out door in the summer?

Friday, April 19, 2013

Really Easy Home-made Ranch Dressing/Dipping Sauce


I'm a little embarrassed to say this, but I like ranch dressing.

There was a time when I had not even SEEN, much less tasted ranch dressing for 15-20 years.  As far as I was concerned, it was '70's and very, very passe.  A waste of my time and palate.

In the late 90's, say 1997 or so, I was the Executive Chef of the Canterbury Hotel in San Francisco.  It was the holiday season and a doctor was throwing a party in some of our event space.  He asked our director of catering for ranch dressing as his party was starting and she came to me.

She evidently thought that I must have a jug of it around somewhere, when I said no, she started to panic.  Seems she had already told him that we had it.

I told her I had not had any since I was a child and did not know what it tasted like, but I said "You know what it tastes like, right?  Let's make some."

Long story short, with her as my taster, we had some in about 5-10 minutes.

I thought, well that is the last time I'll have to deal with that tired old crap.

Four years later I move to Portland Oregon, and become the Executive Chef at Edgefield (a cool hotel owned by an equally cool company) and quickly realized that Ranch Dressing is Haute Cuisine in PDX!

Evidently it is to be served with nearly EVERYTHING!  Including pizza!?!

I am horrified.

This continued for about 6 more years and I started to come around.  While I do not think it belongs on everything, it has it's places.  Mostly salads with bacon and my son's chicken strips.

After trying many commercially produced versions, I set out to create my own.  Not surprising really, I do this a lot.

None of the cookbooks that I own have a recipe, so it was off to the internet.  I read about 40 recipes, selected three, tried one and altered it.  I think that the results were pretty good, but I failed the ultimate test, my son and his chicken strips.  He said it tasted really good, but there were too many vegetables in it!

To say my son doesn't like vegetables would be one of the greatest understatements of all time.  But that is another story.

Here is my recipe:

1 C Buttermilk
1 C Mayonnaise
1 tsp Lemon Juice
1/8 tsp Paprika
1/4 tsp Mustard Powder
1/2 tsp Kosher Salt
1/4 tsp Black Pepper
1 T Flat Leaf Parsley (finely chopped)
1 tsp Chives (finely Chopped)
1/4 tsp dry Thyme (1 tsp if fresh)
1 tsp Granulated Sugar

This one is really about as simple as it can be, put all of the ingredients into a bowl and mix until the texture is smooth and creamy.


This ranch is good as a dressing or dipping sauce.