Tuesday, May 22, 2012

Tuna Tartare - Fresh, Cool and Delicious


Tartare has been one of my favorite dishes for many years.  On our last visit to France (2 week in duration), I ordered it 5 times when we went out to eat.  On the last occasion my wife said "you're having tartare again!?!"
How could I pass it up?  More often than not, restaurants in the states do not have it on the menu.  And this one had a slice of foie gras torchon AND black truffle!
These were steak tartare, usually filet mignon diced into small cubes that is served raw with some accompaniments.
There are other meats that lend themselves well to this preparation and today's blog is about one of those.
Some here is the real story of today's blog:
My daughter has a thing for tartare and for her birthday asked for steak tartare as one of the courses of the meal that the family would have during that meal.  I have an aversion to buying filet mignon for I find it ridiculously over priced.  It is one of my least favorite cuts of beef for any other purpose than tartare as it needs a sauce of else I find it boring in any other preparation.
My wife and I discussed what to do and decided to make Ahi Tuna Tartare for the meal.  This was a dish that was very popular at the restaurant that we owned and also one of my daughters favorite types of fish as she absolutely adores Maguro when we have sushi.


We also have a great fish monger in the neighborhood who has very fresh product, so the decision was easy.
At the fish mongers', he had some beautiful sashimi grade ahi, so I bought a large loin piece, maybe 1.75 lbs (.78 kg).
The recipe for this is really more of a "to taste" sort of preparation, so I'll give you some guidelines to follow when making this.  The idea here is to play and make it what you want it to be, there really is no right or wrong.


I trimmed the ahi so that I had removed the blood line.  The blood line is the very dark red part of the cut that is unpleasant to eat, just tastes like blood.  I don't find it good raw or cooked.


Next I cut away the center of the loin.  


This is the part that will be the tartare, leaving the tougher section and skin.


I remove the skin and reserve the tougher portion.  This part is very good seared or grilled.  My son will not eat raw tuna, so this will be his for my daughters' birthday dinner. 
Next, cut the tuna in 1/4" slices.


Cut those into strips of the same thickness.


Next make the meat into small cubes.  Refrigerate.


It is important that tartare in any form is kept as cold as you can keep it.  First, it has a better "mouth feel" cold and second, it is wise to keep all of your raw meats cold when working with them.  More so when you plan to consume it raw as well.  I'm not the type of person that is afraid of my food, but why take any chances anyway?
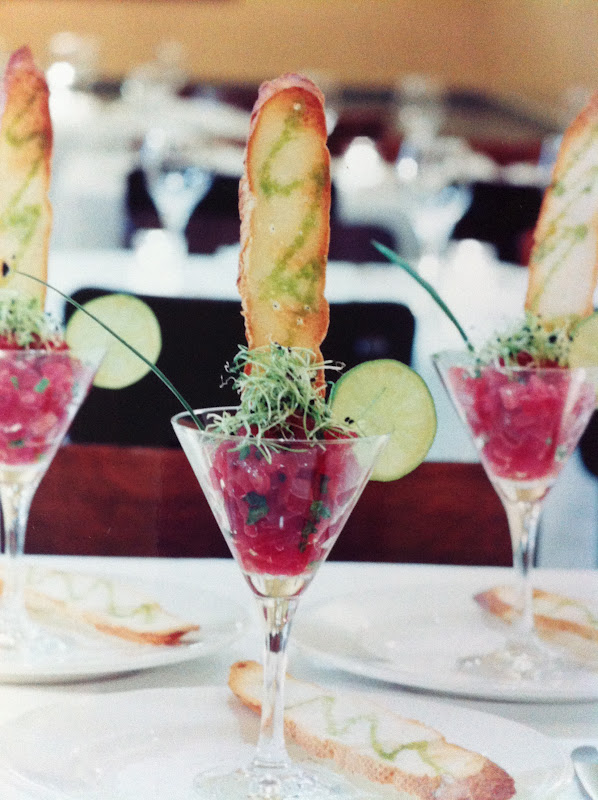
In the restaurant, I served our tartare with habanero oil, thinly sliced scallions, onion sprouts and  really long crustini that was cut from a baguette and drizzled with basil oil.  This was served in a large martini glass.  It was both beautiful and dramatic.


My daughter does not like spicy things, so today I will make a special recipe for her.


I chose to follow a very simple route and let the ingredients speak for themselves.
I added kosher salt, fresh black pepper and a mild extra virgin olive oil (EVOO).  A strong EVOO would overpower the delicate flavor of the fish so I decided against our more robust EVOO.


Once I was satisfied with the flavor, I covered the bowl of tuna and returned to to the refrigerator.
My wife wanted to reveal the tartare on some fun black glass plates that she inherited from her grand mother.  I was not so sure that the presentation would be right.  Turns out it was a good idea, it looked fantastic!


Usually I use a ring mold to present tartare, but today we used some really cool spoons and forks that we purchased in Sweden several years ago.  The idea was to have the tartare spilling over the spoon onto the plate.  The effect worked.  What a lovely meal!

Friday, May 18, 2012

Home Made Hot Sauce


There seems to be a new wave of popularity for hot chiles lately.  Or sauces that are made from them anyway.  This is the second wave of this I've experienced.  The first was in the 90's when I lived in San Francisco.  
Back then it got so crazy that there was a store on Fillmore Street (I think) that sold nothing but hot sauce.  The store did not make it, but what a great idea.  I loved going there and looking at the hundreds of sauces available.  Very fun!
Since there is no such thing as a perfect hot sauce, as every person has slightly different tastes, I decided to make "my perfect hot sauce".


So I sat down to figure out what characteristics mine would contain.  I started out thinking about the sauces that I like and the sauces that I don't.
Currently I am fond of Chalula Chipotle Sauce.  Not particularly hot, but tasty!  I also like the green Tobasco, but with all Tobasco products that I have tasted, the vinegar level is a bit too much for me (this one less so than the regular Tobasco).  Tapatio is also nice but somewhat unremarkable.  I also like Seracha but for this endeavor I am going to avoid an Asian quality and go for a more tex-mex southwestern sort of of sauce.
The sauces that I don't like are ones like the regular Tobasco which for my taste has WAY too much vinegar and sauces like it.  I also am not very fond of most of the habanero sauces that I have had as they are focussing on hot at the expense of flavor.  Habanero chiles have the most delightful flavor if you can work with them to minimize the heat to a level that you can actually taste them and not be steamrolled by the intense heat.
To get going I decided to focus on the chiles that I like the most.  I chose Pobanos, Red Jalepenos and Anaheims.  I also am fond of roasted peppers.  I just love the flavor of roasted chiles.  So I decide to roast all of them.
Here are my thoughts on the three main suspects:  Poblanos are hit and miss in regard to the level of heat that they contain.  Some are very hot, some mild and you don't really know until you taste them.  Red Jalepenos have a really nice heat and a sweetness underlying it that is just wonderful.  They are also used to make Chipotle peppers which are red Jalepenos that are smoked and usually dried as well.  Anaheims are a mild pepper with great flavor especially when roasted.  Not much heat in these, but great flavor.
I started out by roasting the three peppers (see my post about roasting peppers). (http://tastelikechicken-whatsmikecooking.blogspot.com/2012/05/roasted-peppers-two-methods-and-why-i.html).


I read the ingredients of many commercial sauces to get an idea of what I wanted to put in my sauce.  This was simultaneously helpful and confusing.  They all list the main peppers and vinegar, but all of the bottles that I consulted also listed "spices".  Not vey helpful.  I guess that I am on my own.
By the way, if you want to increase the heat of your roasted peppers, chile powder etc. try freezing them for a month or so.  I don't really understand why, but freezing them intensifies the heat.  I learned this the hard way by smoking ten pounds (4.5 kg) of red Jalepenos, packing them in oil and freezing what was not given away or in current use.
The sweetness that made them so amazing was replaced with some near volcanic heat.  They still had a great flavor, but the subtle sweet that was evident in them after smoking was eventually lost and over-powered by the increased heat thus making them less of a joy for myself.
If you are likely to be on my Christmas list, stop reading now please.
Here is my recipe:
2 roasted Pobano peppers
3 roasted Red Jalepeno peppers
2 roasted Anaheim peppers
1/2 yellow onion (diced) (about  1/4 C or 4 oz/ 100 grams)
2 medium sized garlic cloves (about  2 T or 1/4 oz/ 7 grams)
1 T extra virgin olive oil/canola blend (15 ml)
2 oz apple cider vinegar (60 ml)
Kosher Salt
1 tsp Chipotle powder (10 ml)
1 C Water (235 ml)
1/8 tsp Xanthan Gum (.5 ml)
1 tsp granulated sugar
Additional water to adjust the final product.
Here is the method:
Dice the onion and place into a small sauté pan with the oil and sweat it on low heat until translucent.  When the onions are soft and translucent, add the garlic.


Dice the roasted peppers and add them to the pan.  


Sauté until fragrant.  


Add the Chipotle powder.  


Continue to sauté.


When the smokey flavor/smell of the Chipotles just starts to register add 1 C water (240 ml).


Let it roll for about 10-15 mins and add the Xanthan Gum.  5 more minutes and taste what you have.  If the flavor is pleasing, put the entire mix into a blender, add the vinegar and purée.
If you don't have Xanthan Gum in your kitchen and don't know where to find some, go ahead and make your sauce without it.  What it does is keep the particles in solution so that you are less likely to have to shake your sauce before using it as it is less likely to separate.
A word of warning here.  When you put hot stuff into a blender, be sure to hold the lid on tightly!  If you do not, you are likely to blow the lid off of it and you will be finding your sauce for months, literally.  Inside the cupboards, on the ceiling etc.  Also, use a kitchen towel over the top of the blender to protect you from the hot ingredients.  Burns are an occupational hazard, don't seek them out!


There is a reason that I use a blender for this rather than a food processor.  A processor will chop the product but a blender will make it very smooth.  That is what I am after.


Taste your sauce again and adjust your seasoning to your taste by adding more salt, Chipotle powder, white pepper etc and blend again.
Pour the sauce into a container add the sugar and adjust the thickness of your sauce with water.  Let it cool.


Place into your bottle or container that you have chosen.


I have been saving my Chalula bottles and will be using these to bottle my sauce for my use and presents for family and friends.  I am looking for a very small funnel for this purpose, but have not found the right one yet.

Tuesday, May 1, 2012

Roasted peppers - two methods and why I use both.


I love peppers, fresh, dried, ground, whatever.  When I was a child my parents would announce that we were going to a mexican restaurant and apparently we would whine, "not spicy food again!"
I soon learned the errors of our ways.
My parents have a saying that is often repeated, by me as well, that every so often you need to eat something spicy or your fire will go out.


For me, there are two desirable qualities of the chile: heat and flavor.  Let me explain.  There are many chiles that have a lovely flavor that have some heat, but are easy on the palate.  There are also those that will " burn you twice", that can give a great flavor but if handled in a clumsy way, will just burn you to the point that the actual taste of the chile will be lost in the heat.
Habaneros come to mind for the latter.  I'll talk about those another time.
Today I'm roasting peppers to bring out some wonderful flavors and a little heat as well.
The two ways I do this is on the grill and broiled in the oven.  Different methods for different peppers.
Today I'll be working with some commonly available peppers: Anaheim, Poblano (if you are in California they are likely to be labeled as Pasillas) and red Jalepenos.  Oddly enough, when I bought the red Jalepenos they were called " long red peppers".  I've never seen that before.  I'll rant about weird produce labeling another time.
The flavor of each of these chiles will change dramatically with roasting and in my opinion, they should not all be roasted in same way.
How to decide which is right for each pepper?


The thinner the meat of the pepper, the more control you need.
Anaheim peppers have a reasonably thick wall and can be done easily either way, poblanos are very thin and I have found that I get better results (especially when making chile rellenos that the oven is best), Jalepenos can go either way, oven or grill.  As the Jalepeno matures, the outer wall gets thinner and the oven is the better net in my experience.  However today I have decided that the grilled flavor is what I’m after, so i’ll just have to be attentive.  
First rub the peppers with oil.  I use my 25% Extra Virgin Olive Oil/75% Canola blend that I make for this.


For the oven place the peppers on a sheet pan under the broiler and monitor them. 


As the skin of the chiles starts to blister, rotate them so that the skin is blistering on all sides.


For the peppers on the grill, you need a good bed of coals that has a medium heat.  The coals need to burn down a bit so that the chiles do not burn.  Once you are getting a more moderate heat and the coals are completely covered with w white ashy coating they should be ready.  


On the grill, a little more attention is needed as you can burn the peppers if they are not closely watched. 


What you are looking for is a blistering of the skin and some blackening of it as well.  This adds a wonderful smokey flavor that is not available from the oven, hence the two methods.


Once the peppers have been sufficiently roasted, place them in a stainless steel or glass bowl while they are still very hot 


and cover tightly with plastic wrap.
Let the peppers cool enough to touch, peel the tough outer skin from them.


 At this point you can slice them down one side and remove the seeds.


They are ready for salads, sauces, etc.